
Spring
#Spring
脚注
-
#循环依赖:一个Spring经典坑
当你有两个
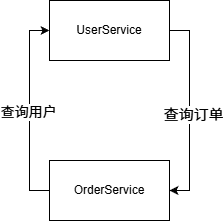
service 时,他们的业务互相关联,比如:用户service需要查询订单service,同时订单service又需要通过用户service来查询用户这样就会形成一个闭环,如下:
#实际代码demo
UserService:@Service public class UserService { @Autowired private OrderService orderService; public Order getUserOrder(Long userId) { return orderService.getOrderByUser(userId); } public User getUser(Long userId) { // 模拟查询后User User user = new User(); user.setId(1L); return user; } }
OrderService:@Service public class OrderService { @Autowired private UserService userService; public Order getOrderByUser(Long userId) { User user = userService.getUser(userId); Order order = new Order(); order.setOrderId("xxx"); order.setAmount(100L); order.setUserId(user.getId()); return order; } }
使用时,会报错如下:
Caused by: org.springframework.beans.factory.UnsatisfiedDependencyException: Error creating bean with name 'orderService': Unsatisfied dependency expressed through field 'userService': Error creating bean with name 'userService': Unsatisfied dependency expressed through field 'orderService': Error creating bean with name 'orderService': Requested bean is currently in creation: Is there an unresolvable circular reference or an asynchronous initialization dependency?
	at org.springframework.beans.factory.annotation.AutowiredAnnotationBeanPostProcessor$AutowiredFieldElement.resolveFieldValue(AutowiredAnnotationBeanPostProcessor.java:767)
.....
#临时解决方案
给
UserService依赖添加@lazy@Lazy @Autowired private UserService userService;
Tip
#什么是 @lazy
@Lazy 是 Spring 框架中的一个注解,用于实现 Bean 的延迟初始化。
#核心概念
#默认行为 vs @Lazy
场景 初始化时机 默认(无@Lazy) Spring 容器启动时立即创建 Bean 使用 @Lazy 首次从容器获取 Bean 时才创建
#使用方式
#1️⃣ 类级别使用
@Component @Lazy // 整个类延迟初始化 public class ExpensiveService { public ExpensiveService() { System.out.println("ExpensiveService 被创建了!"); // 假设这里有耗时的初始化操作 } public void doSomething() { System.out.println("执行操作..."); } }#2️⃣ 配置类中使用
@Configuration public class AppConfig { @Bean @Lazy // 该 Bean 延迟初始化 public DataSource dataSource() { System.out.println("创建数据库连接池..."); return new HikariDataSource(); } }#3️⃣ 注入时使用(推荐)
@Service
public class OrderService {

    private final ExpensiveService expensiveService;

    @Autowired
    @Lazy  // 注入时标记为延迟加载
    public OrderService(ExpensiveService expensiveService) {
        this.expensiveService = expensiveService;
    }
}
#工作原理图解
┌─────────────────────────────────────────────────────┐
│                  Spring 容器启动                      │
├─────────────────────────────────────────────────────┤
│                                                      │
│   @Component          @Component @Lazy               │
│   ┌─────────┐         ┌─────────────┐               │
│   │ ServiceA │         │  ServiceB   │ ← 不创建!    │
│   │  ✓创建   │         │  (仅注册)    │               │
│   └─────────┘         └─────────────┘               │
│                                                      │
└─────────────────────────────────────────────────────┘
                         │
                         ▼ 当首次使用 ServiceB 时
┌─────────────────────────────────────────────────────┐
│              ServiceB 首次被调用                       │
├─────────────────────────────────────────────────────┤
│                                                      │
│   ┌─────────────┐                                    │
│   │  ServiceB   │ ← 此时才真正创建!                  │
│   │   ✓创建     │                                    │
│   └─────────────┘                                    │
│                                                      │
└─────────────────────────────────────────────────────┘
#实际应用场景
#场景1:解决循环依赖
@Service public class ServiceA { @Autowired @Lazy // 打破循环依赖 private ServiceB serviceB; } @Service public class ServiceB { @Autowired private ServiceA serviceA; }#场景2:重量级资源延迟加载
@Service public class ReportService { @Lazy @Autowired private MLModelService mlModelService; // 加载大型机器学习模型 public Report generateReport() { // 只有在生成报告时才加载模型 return mlModelService.analyze(); } }#场景3:可选功能
@Component
public class PaymentService {

    @Lazy
    @Autowired(required = false)
    private Optional<wechatpayservice> wechatPay; // 可选的微信支付

    public void pay() {
        wechatPay.ifPresent(service -> service.pay());
    }
}
#全局延迟配置(Spring Boot)
在
application.yml中可以全局开启延迟初始化:spring: main: lazy-initialization: true # 所有 Bean 都延迟初始化
#注意事项
注意点 说明 单例特性不变 @Lazy Bean 仍然是单例,首次创建后会缓存 @Lazy 失效情况 被 @PostConstruct、SmartInitializingSingleton等主动触发时可能失效测试困难 延迟加载的 Bean 在测试中可能需要额外处理 启动快,首次慢 启动时间缩短,但首次调用会有延迟
#总结
@Lazy = 推迟 Bean 的创建时机

何时使用?
├── 解决循环依赖
├── 减少启动时间(轻量级应用)
├── 延迟加载重量级资源
└── 可选/按需加载的功能
#Spring2.6前的情况
在Spring2.6前,Spring遇到这种情况会自动帮你兜底,除了你自己用构造器创建的bean。
但后续删了这个特性,因为这样子的情况本就是设计问题,使用
@lazy只是缓兵之计。
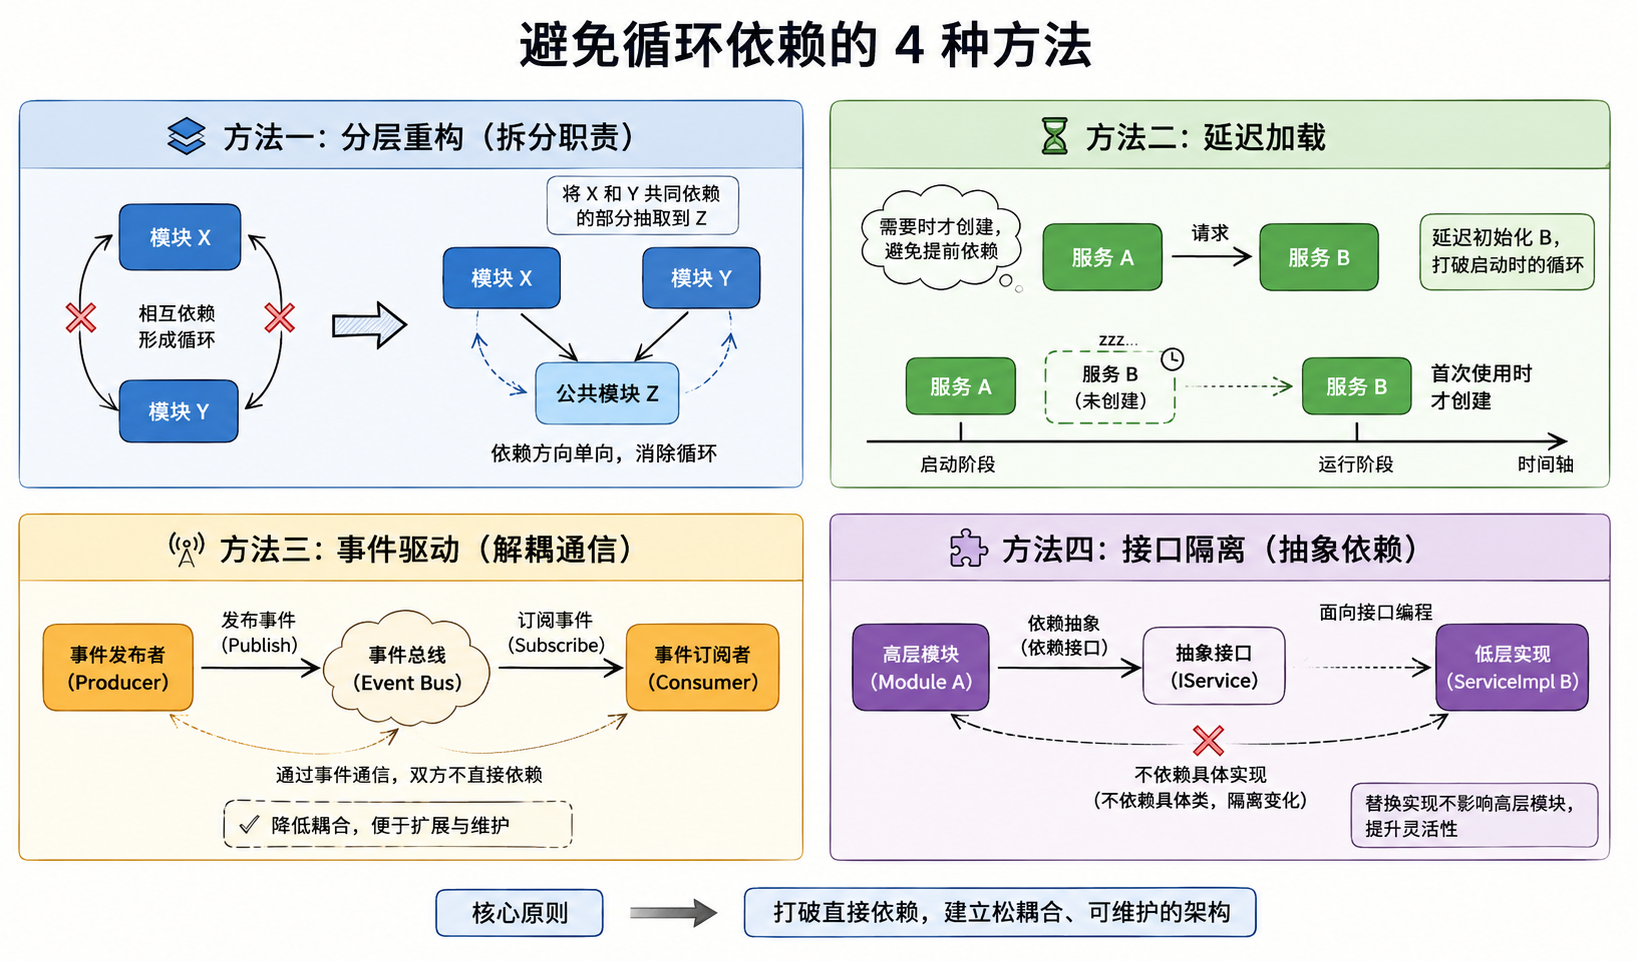
#如何避免循环依赖
↩
-
#什么是Spring Bean
由Spring全权管理的“对象”容器
普通的对象:自己new自己管理
#Spring Bean 的两种常见定义方式
#一、组件扫描(Component Scanning)
通过注解 + 自动扫描的方式,让 Spring 自动发现并注册 Bean。
#核心注解
注解 语义 典型场景 @Component通用组件 工具类、通用服务 @Service业务逻辑层 Service 层 @Repository数据访问层 DAO / Mapper 层 @Controller /@RestController控制器层 Web 接口层 #示例
// 1. 标注注解 → 声明"我是一个 Bean" @Service public class UserService { public User findById(Long id) { // ... } } // 2. 配置扫描路径(Spring Boot 自动处理) @SpringBootApplication // 内含 @ComponentScan public class MyApp { public static void main(String[] args) { SpringApplication.run(MyApp.class, args); } }#工作流程
Spring 启动
    │
    ▼
扫描指定包路径下所有类
    │
    ▼
发现 @Component / @Service / @Repository / @Controller
    │
    ▼
自动创建实例并注册到 IoC 容器
    │
    ▼
Bean 可用,支持 @Autowired 注入
#二、配置类(Java Config / @Bean)
通过
@Configuration +@Bean 手动声明 Bean 的创建逻辑。#示例
@Configuration public class AppConfig { @Bean public DataSource dataSource() { HikariDataSource ds = new HikariDataSource(); ds.setUrl("jdbc:mysql://localhost:3306/mydb"); ds.setUsername("root"); ds.setPassword("123456"); return ds; } @Bean public RestTemplate restTemplate() { return new RestTemplate(); } // 方法名就是 Bean 的名称,也可以自定义 @Bean("myCache") public CacheManager cacheManager() { return new ConcurrentMapCacheManager("users"); } }#工作流程
Spring 启动
    │
    ▼
发现 @Configuration 类
    │
    ▼
执行所有 @Bean 方法
    │
    ▼
将返回对象注册到 IoC 容器
    │
    ▼
Bean 可用,支持 @Autowired 注入
#三、核心对比
┌──────────────┬─────────────────────┬──────────────────────┐
│     维度      │   组件扫描            │   配置类 @Bean         │
├──────────────┼─────────────────────┼──────────────────────┤
│  控制粒度     │  低,自动发现          │  高,精确控制           │
│  适用对象     │  自己写的类            │  第三方库的类           │
│  创建逻辑     │  默认构造函数          │  完全自定义             │
│  代码侵入性   │  需要加注解            │  无侵入,类不用改动       │
│  集中管理     │  分散在各类中          │  集中在一个配置类         │
│  条件装配     │  @Conditional 系列    │  同样支持,更灵活         │
└──────────────┴─────────────────────┴──────────────────────┘
#四、典型应用场景
#✅ 用组件扫描的场景
// 自己写的业务代码,直接加注解即可 @Repository public class UserDao { public User find(Long id) { ... } } @Service public class UserService { @Autowired private UserDao userDao; // 自动注入 }#✅ 用 @Bean 的场景
@Configuration
public class ThirdPartyConfig {

    // 第三方库的类,你无法在源码上加 @Component
    @Bean
    public ModelMapper modelMapper() {
        ModelMapper mapper = new ModelMapper();
        mapper.getConfiguration()
              .setMatchingStrategy(MatchingStrategies.STRICT);
        return mapper;
    }

    // 需要复杂初始化逻辑的 Bean
    @Bean
    public ObjectMapper objectMapper() {
        ObjectMapper om = new ObjectMapper();
        om.registerModule(new JavaTimeModule());
        om.disable(SerializationFeature.WRITE_DATES_AS_TIMESTAMPS);
        om.setSerializationInclusion(JsonInclude.Include.NON_NULL);
        return om;
    }
}
#五、总结一句话
- 自己写的类 → 加
@Component 系列注解,走组件扫描,简单省事 - 第三方类 / 需要复杂初始化 → 用
@Configuration +@Bean,走配置类,灵活可控
两者并不冲突,实际项目中通常是混合使用的。
↩
- 自己写的类 → 加
评论
还没有评论,来说点什么吧。